How to conduct student admissions offline?
Documentation / Student Information /
Miscellaneous
- About Chat
- About Calendar
- How to add new event in calendar?
- How to add To Do List?
- How to add contact in chat?
Academics
- About Academics
- How to add Section?
- How to add Class?
- How to Assign Class Teacher?
- How to add Subjects?
Online Admission
- About Online Admission?
- How to manage online admission setting?
- How to fill online admission form?
- How to review online admission form details?
- How to print online admission form receipt?
Fees Collection
- About Fees Collection
- How to add Fees Type?
- How to add Fees Group?
- How to add Fees Master?
- How to add Fees Discount?
Examinations
- About Examination
- How to add Marks Grade?
- How to add Exam Group?
- How to assign/view student for exam?
- How to add subject in Exam?
Front CMS
- About Front CMS
- How to add menus?
- How to upload file in Media Manager?
- How to add pages?
- How to add Event?
Online Course
- About Online Course?
- How to add Course?
- How to order section?
- How to publish/unpublish course?
- How to check online course from student panel?
Two Factor Authentication
- About Two Factor Authentication
- How to enable / disable Two Factor Authentication?
- How to Setup 2FA?
- How to Install the Google Authenticator app on a mobile device?
- How to delete the 2FA account for superadmin or staff?
Zoom Live Classes
- How to generate the zoom API credential?
- About zoom live class
- How to configure zoom live class?
- How to enable/disable teacher API credential?
- How to enabled / disabled the parent for zoom live classes?
Lesson Plan
- About Lesson Plan
- How To Add Lesson?
- How To Add Topic?
- How to add Lesson Plan?
- How To Manage Syllabus Status?
QR Code Attendance
- About QR Code Attendance
- How to disabled the auto attendance and mark the attendance of student and staff using QR Code / Barcode?
- How to enable the auto attendance and mark the attendance of student and staff using QR Code / Barcode?
- How to check the student day wise attendance report?
- How to check staff day wise attendance report?
Front Office
- About Front Office
- How to Setup Front Office?
- How to add student Admission Enquiry?
- How to add Visitor Book?
- How to add Phone Call Log?
Certificate
- About Certificate
- How to add student Certificate?
- How to generate Certificate?
- How to add student ID card?
- How to generate ID card?
Transport
- About Transport
- How to create Routes?
- How to add Vehicles?
- How to assign vehicle to the Route?
- How to assign route to student?
Inventory
- About Inventory
- How to create Item Category?
- How to add Item Store?
- How to add Item supplier?
- How to add Item?
Homework
- About Homework
- How to add Homework?
- How to Evaluate Homework?
- How to check Daily Assignment Report?
- How to check Homework Evaluation Report?
Communicate
- About Communicate
- How to post new message in Notice Board?
- How to Send Email?
- How to Send SMS?
- How to view Email / SMS Log?
Student/Parent Panel
- About Student/Parent panel
- How to view video tutorial from student site?
- How to add daily assignment from the student side?
- How student can view their yearly (session) Attendance from student panel?
- How to see student dashboard?
FAQ
- Can I use special character in FiNIMS?
- How to restrict Teacher to access only their assigned student data?
- How to assign fees to student in FiNIMS ?
- Want to know about FiNIMS Biometric Attendance App?
- What is the difference between Examination and Online Examination?
System Settings
- How to add the addons on FiNIMS ?
- About System Settings
- About ID Auto Generation
- How to manage attendance type?
- How to manage miscellaneous?
CBSE Examination
- About CBSE Examination
- How to add the term in CBSE Examination?
- How to add assessment in CBSE Examination?
- How to add the observation parameter in CBSE Examination?
- How to add observation in CBSE Examination?
Student Information
- About Student Information
- How to check Student yearly (session) Attendance in his profile?
- How to check Parent Login Credential Report?
- How to Assign Fees during Student Enrolment?
- How to check class & section report?
Online Examinations
- About Online Examination
- How to add Question Bank?
- How to import question in question bank?
- How to add Online Exam?
- How to add question on particular exam?
Income
- About Income
- How to add Income Head?
- How to add Income?
- How to search Income?
- How to check Income Report?
Multi Branch
- About Multi Branch
- How to add the new branch in FiNIMS home branch?
- How to edit a branch?
- How to delete the branch?
- How to switch the branch?
Behaviour Records
- About Behaviour Records
- How to check the list of incidents?
- How to edit the incidents in the incident list?
- How to delete an incident from the incident list?
- How to add the incidents?
Gmeet Live Class
- About Gmeet Live Classes
- How to get Gmeet URL?
- How to create Gmeet Live Class?
- How to join Gmeet Live Class?
- How to check Gmeet Live Class Report?
Attendance
- How to mark student attendance?
- How to check Student Attendance By Date?
- How to check student Attendance Report?
- How to check Student Attendance Type Report?
- How to check Staff Attendance report?
Human Resource
- About Human Resource
- How to add Department?
- How to add Designation?
- How to add Leave Type?
- How to add Staff Directory?
Hostel
- About Hostel
- How to Add Hostel?
- How to Add Room Type?
- How to Add Hostel Rooms?
- How to check Hostel Report?
Library
- About Library
- How to add Book?
- How to add student as Library Member?
- How to add staff member as Library Member?
- How to Issue/Return books?
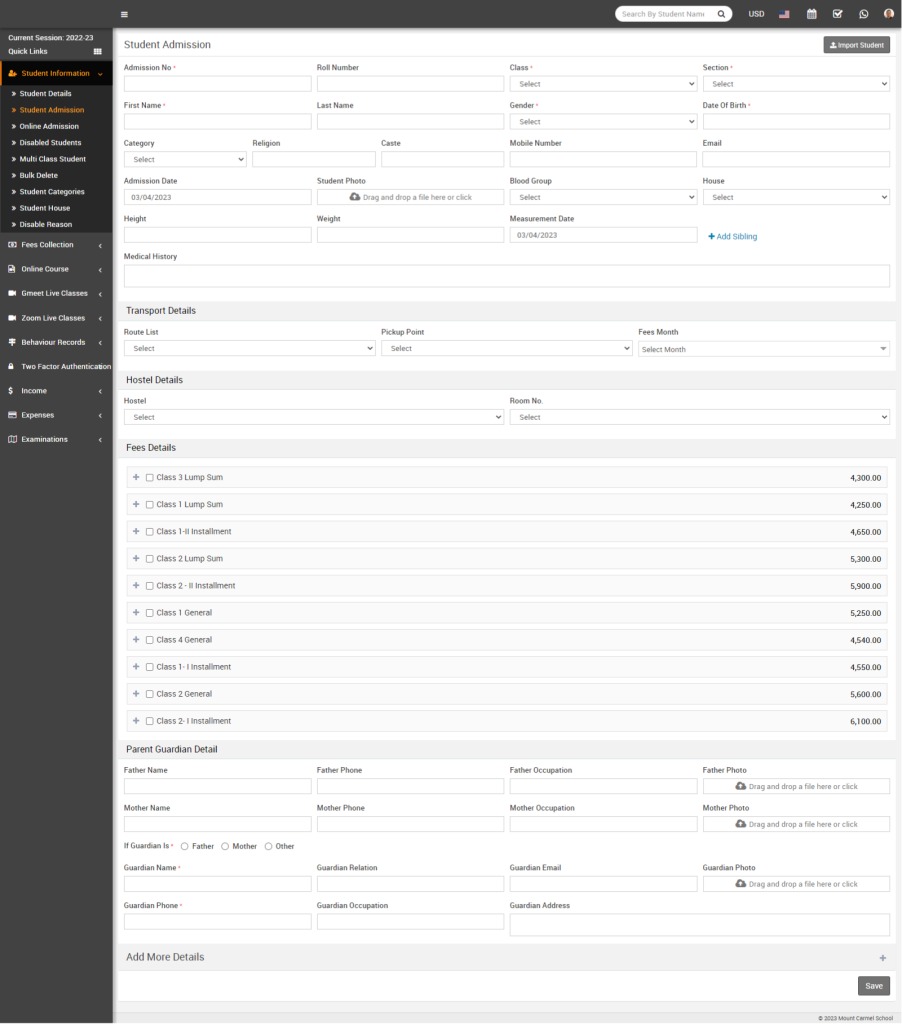
To add a Student Admission, go to Student Information > Student Admission.
-
Enter the Admission No. (if you want the admission number to be auto-generated, enable this option from System Settings > General Settings).
-
Enter the Roll Number (note: roll number does not have any validation and is only used for reference. The system will auto-generate a roll number while creating admit cards from the Exam Module).
-
Fill in the required student details such as Class, Section, First Name, Last Name, Gender, Date of Birth, Category, Religion, Caste, Mobile Number, Email, Admission Date, Student Photo, Blood Group, Student House, Height, Weight, and As on Date.
Add Sibling
Click on Add Sibling to open the sibling modal. Select the Class, Section, and Student, then click the Add button.
(Note: If a student has more than one sibling in the institute, you only need to select one sibling. The system will automatically detect and link the other siblings.)
Add Parent/Guardian Details
Fill in the parent/guardian details, including:
-
Father’s Name, Phone, Occupation, and Photo
-
Mother’s Name, Phone, Occupation, and Photo
-
Guardian’s Details
After completing the information, click on the Save button.
Add Additional Student Details
If you want to add more details, click the Add (+) icon. Here you can enter:
-
Student Address Details
-
Transport Details
-
Hostel Details
-
Miscellaneous Details
-
Upload Documents
Finally, click the Save button to complete the admission process.